Understanding Seattle Building Codes for Homebuyers (Historical Overview)
- Ryan Palardy,
- October 21, 2025
Seattle’s homes reflect the building code in place when they were built. That history shows up in day-to-day living: how solid the home feels in a storm, whether a basement room counts as a bedroom, and what happens when you pull a remodel permit. Understanding the Seattle residential building codes, both past and present, can tell you much about what to expect from your new (or old) home. Seattle adopts Washington’s codes with local amendments, so the rules change by edition—your permit dates tell you which version applied.
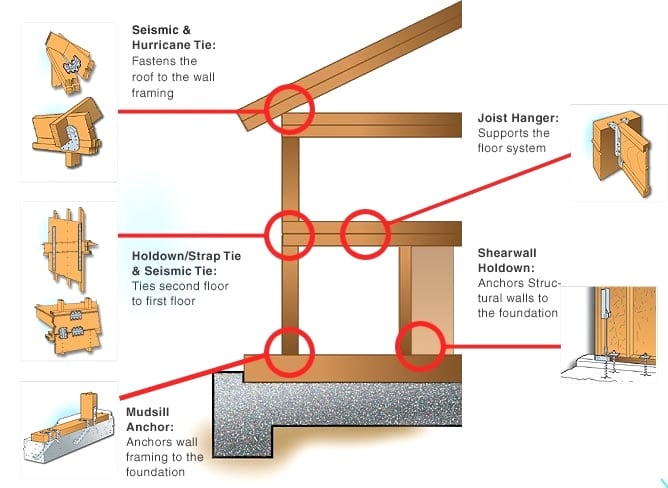
Seattle’s risk, in brief. Seattle sits near the Seattle Fault Zone and other regional faults. That hazard explains why many older houses need anchoring and why newer ones rely on engineered shear walls, hold-downs, and metal connectors.
Pre-1980 wood-frame homes: Often missing foundation bolting and braced cripple walls—the main weak points in shaking.
Modern construction: Engineered shear walls, hold-downs, and specific anchorage reviewed under the current code cycle.
Anchor bolts/approved anchors tying the sill plate to the foundation.
Plywood sheathing on short “cripple” walls to resist lateral loads.
Shear transfer ties/hold-downs where needed to tie floors to the foundation
Seattle offers a prescriptive retrofit path and a streamlined permit for many typical houses; complex conditions still need an engineer.
Ask: Has this home been seismically retrofitted? What year, what scope, and was it permitted?
In the crawlspace/garage, look for anchor bolts with plate washers and plywood on cripple walls.
If available, get the permit number and any planset/engineer letter; keep these with your records for insurance, resale, and lending.
Costs to Retrofit: The scope of a retrofit depends on crawlspace access, foundation condition, house size/layout, and whether finishes must be removed to reach work areas. A quick site review will tell you which of these will move the budget. In general, typical wood-frame retrofit budgets run about $5,000–$12,000.
Brick or concrete block buildings without steel reinforcement are notably vulnerable to seismic loads. Retrofitting these buildings is far costlier than wood-frame work and may not be feasible in every case.
1. Check if it appears in the City’s URM inventory, and be prepared to confirm with on-site clues.
Ask whether any retrofit has been recognized by the City.
With condos, ask about planned timelines, assessments, or HOA funding for future work.
Insurance angle. Some carriers offer earthquake-related discounts with documented retrofits. Proof typically means permit finals, photos, and (if applicable) an engineer letter. Save the paperwork.
Want a quick read before you offer? Request a Seismic Retrofit Review on the specific address of the home you’re interested in buying or selling. We’ll confirm whether work was done, estimate missing scope, and outline likely next steps so you can price out your risk and plan your inspection strategy. Many of Seattle’s best homes are not retrofitted. And, in the case of “the big one” even a retrofitted home may still sustain significant damage. Don’t be afraid of these homes; we can help you weigh the relative risk.
That “extra bedroom” in a basement may not be a legal sleeping room. Seattle residential building code rules require that every bedroom needs an emergency escape and rescue opening, aka a window or door you can open from the inside without tools. Basements and habitable attics need one too, and if a basement has multiple bedrooms, each bedroom needs its own opening.
Size and placement matter. The opening has to meet minimum clear dimensions (area, width/height) and the sill can’t be more than 44 inches above the floor. If the window sits under a deck or porch, it must fully open and provide a clear path at least 36 inches high to the yard—so a low deck often blocks compliance. Older basements miss on details like windows tucked under porches (no 36-inch path), narrow sliders that don’t provide enough clear opening, or high sills.
Replacing windows in an older home? Good news: Seattle building code usually doesn’t require you to fully build out an egress window. When you replace an existing emergency escape window, you may use the manufacturer’s largest standard size that fits the existing frame or rough opening, even if it doesn’t meet today’s new-construction dimensions—provided certain conditions are met. This keeps safety intent while avoiding full wall rebuilds. Bring your inspector in early if you’re unsure which path applies.
New homes in Seattle have to pass an air-leakage test. A pro sets a fan in an exterior door, pulls air out, and measures how much the house leaks. Less leakage = fewer drafts, steadier temps, and usually lower bills.
The blower door test report (it’s a one-pager with the result and date).
A simple energy spec sheet: insulation levels, window type, and the heating/AC system (heat pump vs. furnace). All of this, with the exception of insulation R-values, should also be evident from your home inspection.
If the report says the home passed, you’re generally in good shape.
If it barely passed or the builder can’t find the report, ask what air-sealing punch-list items they’ll handle before closing (door weatherstripping, attic hatches, obvious gaps).
Stand near windows and exterior doors: any draft?
Run a bath fan for a minute: does it actually move air?
Close bedroom doors with the heat on: does one room get stuffy or cold?
You won’t get a blower door report, so look for updated windows, added attic or crawl insulation, and a heat pump or other efficient system. If the house feels drafty, add air sealing to your first-year to-do list—it’s inexpensive and noticeable.
Many homeowners and homebuyers worry that they will be required to bring their whole house “up to code” if they do any renovation work. This is not always the case.
Seattle’s Existing Building Code (SEBC) lets you fix and upgrade older homes without dragging the whole house to today’s standards. That is at least until your scope turns into what’s called a “substantial alteration.” At that point, the City can require added work for seismic, life-safety, and energy, sometimes even beyond the rooms you’re renovating.
Structural work: removing load-bearing walls, adding a story or big dormers, moving stairs, cutting large openings.
Systems updates: full rewire with new service, full re-ducting, whole-house re-pipe.
Area changes: finishing large portions of basements/attics into bedrooms or adding conditioned square footage.
Lateral changes: anything that alters how the house resists earthquakes.
Seismic: foundation bolting, braced cripple walls.
Life-safety: smoke/CO alarms to current locations, legal egress for new bedrooms, tempered glass where required.
Energy: insulation, air-sealing, and window requirements in areas you open up.
Decide the end state first. If a new bedroom is likely later, design for it now.
Ask your designer/GC: “Does this scope risk a substantial-alteration call?” Get a straight answer.
Sequence smartly. Phasing—Phase 1 repairs/limited finishes, Phase 2 larger reframing—can help you stay compliant without triggering whole-house upgrades too soon.
Budget a cushion. Old houses reveal rot, odd framing, or foundation fixes that add scope.
Planning a studs-out remodel? We can review your concept against SEBC, flag likely triggers, and suggest a permit sequence that protects timeline and budget.
Seattle Building Code and the city’s electrical rules track a current code cycle with local amendments. That means permits pulled today are reviewed under a newer edition than work done 10 years ago—so “new panel” only means “new as of that code year.”
Permits & finals: Any panel change, service upgrade, or new circuits should have a permit number and final inspection. Ask for the paperwork; it tells you which code edition applied.
Protection devices: Newer work typically adds AFCI (arc-fault) protection in living areas and GFCI where water is present (kitchens, baths, exterior, garages). Expect tamper-resistant receptacles in most living areas of newer work.
Labeling & capacity: The panel should have a legible directory, listed breakers that match the panel brand, and enough capacity for added loads (EV charger, heat pump, ADU).
Grounding & bonding: Look for a proper grounding electrode system (ground rods or UFER), bonded metal water piping, and correct neutrals/grounds separation in subpanels.
Aluminum branch circuits (1960s–1970s): If present, confirm approved connectors/remediation; insurers care.
What to ask for as a buyer
Get the permit history for panel changes or major rewires; confirm a final inspection.
Have your inspector check for AFCI/GFCI where required and for double-tapped breakers or overheated bus bars.
If you plan big electrical loads, ask an electrician for a quick load calculation before closing—service upgrades can affect budget and schedule.
Bottom line: Seattle Building Code enforcement means newer work usually meets higher safety standards. Paperwork plus a clean inspection beats the phrase “recent electrical” every time.
How many / where: Seattle now allows up to two ADUs per lot (any mix of attached and detached) in zones where homes are allowed. Parking and owner-occupancy are not required.
Size & siting (DADUs): In Neighborhood Residential zones, a detached ADU (DADU) is generally capped at 1,000 sq ft, with height and setback rules based on lot and zone. Check your lot specifics before designing.
Life-safety: Each ADU is a separate dwelling unit, so it needs its own smoke and CO alarms, code egress, and typical residential clearances. (If it’s an attached ADU, expect a fire-resistance-rated separation between units—commonly 1-hour—and compliance will be verified at permit/inspection.)
Sound control (attached ADUs): Seattle enforces minimum sound ratings between units (think STC 45 / IIC 50 assemblies). Good for privacy—and required.
Energy code: New ADUs must meet current energy/insulation and ventilation standards; your plans and inspections will confirm insulation, windows, and mechanicals.
Permitting help: Seattle’s ADUniverse provides pre-approved DADU plans and a step-by-step guide—useful for feasibility and timeline planning.
Bottom line: On the right lot, a permitted ADU is straightforward—and it rents better, appraises cleaner, and avoids resale headaches. We can sanity-check your lot (size, setbacks, utilities) and flag whether an attached or detached path will be simpler under current rules.
| Era | Likely gaps | What to expect |
|---|---|---|
| Pre-1950s | No seismic anchoring; knob-and-tube wiring; energy inefficiencies; possible URM | Plan for retrofit/rewiring/abatement; prioritize safety upgrades |
| 1950s–1970s | Limited seismic; aluminum wiring in some; asbestos; single-pane windows | Expect panel/wiring updates, window replacements, targeted remediation |
| 1980s–1990s | Improved seismic/insulation; systems aging out | Roof/plumbing/HVAC likely due; consider efficiency upgrades |
| 2000s–2010s | Stronger seismic & life-safety; better energy baseline | Verify alarm placement, permits, and documented energy features |
| 2020s (current cycle) | Documented blower door testing; stricter energy and alarms | Request blower door results and compliance docs from the builder |
No. Code obligations attach to permitted work, not a change in ownership. Still, seismic and alarm upgrades are high-value safety priorities.
Heat source, conforming egress (escape window/door to the outside) and required smoke/CO alarms. Older basements often need design changes to comply.
Airtightness test for new homes and major additions. Lower leakage generally means better comfort, moisture control, and efficiency.
Under Seattle building code, structural/systems projects can be deemed a “substantial alteration,” which may trigger seismic, life-safety, and energy updates beyond the immediate work area.
Often yes—carriers may offer discounts with documented retrofits. Ask your insurer what proof they require.